 Yamaha aerox NS50 - Owner's Manual > Checking the spark plug
The spark plug is an important engine component, which should be checked periodically, preferably by a Yamaha dealer. Since heat and deposits will cause any spark plug to slowly erode, it should be removed and checked in accordance with the periodic maintenance and lubrication chart. In addition, the condition of the spark plug can reveal the condition of the engine.
The porcelain insulator around the center electrode of the spark plug should be a medium-to-light tan (the ideal color when the vehicle is ridden normally). If the spark plug shows a distinctly different color, the engine could be operating improperly. Do not attempt to diagnose such problems yourself. Instead, have a Yamaha dealer check the vehicle.
If the spark plug shows signs of electrode
erosion and excessive carbon or
other deposits, it should be replaced.

Before installing a spark plug, the spark plug gap should be measured with a wire thickness gauge and, if necessary, adjusted to specification.
- Spark plug gap
Spark plug gap: 0.6-0.7 mm (0.024-0.028 in)
Clean the surface of the spark plug gasket and its mating surface, and then wipe off any grime from the spark plug threads.
Tightening torque: Spark plug: 20 Nm (2.0 m*kgf, 14 ft*lbf)
TIP
If a torque wrench is not available when installing a spark plug, a good estimate of the correct torque is 1/4-1/2 turn past finger tight. However, the spark plug should be tightened to the specified torque as soon as possible.
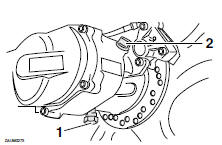
Final transmission oil
The final transmission case must be checked for oil leakage before each ride. If any leakage is found, have a Yamaha dealer check and repair the scooter. In addition, the final transmission oil must be changed as follows at the intervals specified in the periodic maintenance and lubrication chart.
1. Start the engine, warm up the final transmission oil by riding the scooter for several minutes, and then stop the engine.
2. Place the scooter on the centerstand.
3. Place an oil pan under the final transmission case to collect the used oil.
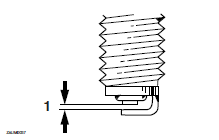
4. Remove the final transmission oil filler cap and its O-ring from the final transmission case.
- Final transmission oil drain bolt
- Final transmission oil filler cap
5. Remove the final transmission oil drain bolt and its gasket to drain the oil from the final transmission case.
6. Install the final transmission oil drain bolt and its new gasket, and then tighten the bolt to the specified torque.
Tightening torque: Final transmission oil drain bolt: 18 Nm (1.8 m*kgf, 13 ft*lbf)
7. Refill with the specified amount of the recommended final transmission oil. WARNING! Make sure that no foreign material enters the final transmission case.
Make sure that no oil gets on the tire or wheel. [
Recommended final transmission oil
Oil quantity: 0.11 L (0.12 US qt, 0.10 Imp.qt)
8. Install the final transmission oil filler cap and its new O-ring, and then tighten the oil filler cap.
9. Check the final transmission case for oil leakage. If oil is leaking, check for the cause.
Coolant
The coolant level should be checked before each ride. In addition, the coolant must be changed at the intervals specified in the periodic maintenance and lubrication chart.
To check the coolant level
1. Place the vehicle on a level surface and hold it in an upright position.
TIP
- The coolant level must be checked on a cold engine since the level varies with engine temperature.
- Make sure that the vehicle is positioned straight up when checking the coolant level. A slight tilt to the side can result in a false reading.
2. Check the coolant level through the check window.
TIP
The coolant should be between the minimum and maximum level marks.
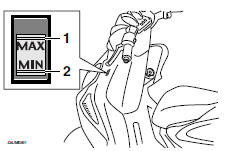
1. Maximum level mark
2. Minimum level mark
3. If the coolant is at or below the minimum level mark, remove the cowling A.
4. Open the reservoir cap, and then add coolant to the maximum level mark.
WARNING! Remove only the coolant reservoir cap. Never attempt to remove the radiator cap when the engine is hot.
NOTICE: If coolant is not available, use distilled water or soft tap water instead. Do not use hard water or salt water since it is harmful to the engine.
If water has been used instead of coolant, replace it with coolant as soon as possible, otherwise the cooling system will not be protected against frost and corrosion. If water has been added to the coolant, have a Yamaha dealer check the antifreeze content of the coolant as soon as possible, otherwise the effectiveness of the coolant will be reduced.
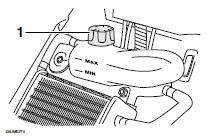
- Coolant reservoir cap
Coolant reservoir capacity: 0.25 L (0.26 US qt, 0.22 Imp.qt)
5. Close the reservoir cap, and then install the cowling.
See also:
 Yamaha aerox NS50 - Owner's Manual > Periodic maintenance and Adjustment
Periodic inspection, adjustment, and lubrication will keep your vehicle in the safest and most efficient condition possible. Safety is an obligation of the vehicle owner/operator. The most important points of vehicle inspection, adjustment, and lubrication are explained on the following pages.
Yamaha aerox NS50 - Owner's Manual > Changing the coolant
The coolant must be changed at the intervals specified in the periodic maintenance and lubrication chart. Have a Yamaha dealer change the coolant. WARNING! Never attempt to remove the radiator cap when the engine is hot.
 BMW R 1250 RT
 Kymco Agility 50
 Piaggio Liberty 50
 Yamaha aerox NS50
 Aprilia SR50R
 Kymco Agility 50
 Vespa Primavera 50
 Peugeot Speedfight