 Piaggio Liberty 50 - Owner's Manual > Long periods of inactivity
Battery performance will be poor if the vehicle is not used for a long time. This is the result of the natural phenomenon of battery discharging, and may be due to residual absorption by vehicle components with constant power consumption. Poor battery performance may also be due to environmental conditions and the cleanliness of the poles. In order to avoid difficult starts and/or irreversible damage to the battery, follow any of these steps:
- At least once a month start the engine and run it slightly above idle speed for 10-15 minutes. This keeps all the engine components, as well as the battery, in good working order.
- Take your vehicle to a garage (as indicated in the "Vehicle not used for extended periods" section) to have the battery removed. Have the battery cleaned, charged fully and stored in a dry, ventilated place. Recharge at least once every two months.
N.B.
THE BATTERY MUST BE CHARGED WITH A CURRENT EQUAL TO 1/10 OF THE RATED CAPACITY OF THE BATTERY AND FOR NOT LONGER THAN 10 HOURS.
CONTACT AN AUTHORISED SERVICE CENTRE TO CARRY OUT THIS OPERATION SAFELY. WHEN REFITTING THE BATTERY MAKE SURE THE LEADS ARE CORRECTLY CONNECTED TO THE TERMINALS.
WARNING
DO NOT DISCONNECT THE BATTERY CABLES WITH THE ENGINE RUNNING, THIS CAN CAUSE IRREPARABLE DAMAGE TO THE VEHICLE'S ELECTRONIC CONTROL UNIT.
WARNING
USED BATTERIES ARE HARMFUL FOR THE ENVIRONMENT. COLLECTION AND DISPOSAL SHOULD BE CARRIED OUT IN COMPLIANCE WITH REGULATIONS IN FORCE.
Fuses
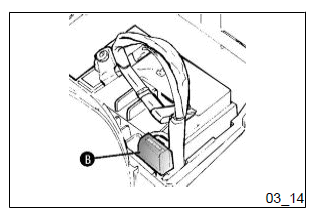
The electrical system is protected by a plug fuse "B" located to the left of the battery compartment. The ignition system, headlight and the rear light are not fuse-protected.
Before replacing a blown fuse, find and solve the problem that caused it to blow. Do not replace the fuse with any alternative form of conductor
CAUTION
IN ORDER TO AVOID DAMAGING THE ELECTRICAL SYSTEM, NEVER DISCONNECT THE WIRING WHILE THE ENGINE IS RUNNING. DO NOT TIP THE VEHICLE TOO MUCH IN ORDER TO AVOID DANGEROUS LEAKAGE OF THE BATTERY ELECTROLYTE.
Front light group

To access the bulbs in the headlight assembly, remove the front handlebar fairing as follows:
1) Disassemble the rear-view mirror following the instructions and figure on section " Adjusting The Rear-View Mirrors ".
2) Unscrew the 3 handlebar fairing screws, i.e. the front central screw "B" and the two rear screws "A".
3) Remove the handlebar fairing to access the headlight and bulbs.
USE A SCREWDRIVER WITH A WORKING END APPROPRIATE TO THE SCREW SIZE TO AVOID DAMAGING THE PAINTWORK.
Electric characteristic
Headlight bulb
1 high beam/low beam twin-filament bulb
1 position light bulb
Head light adjustment
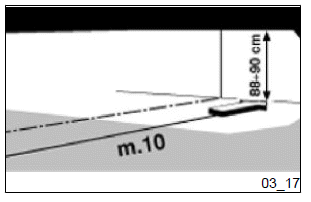
Set the unladen scooter on level, even ground at a distance of 10 m from a flat wall or screen that is sufficiently darkened to be able to see the beam. Make sure that the scooter axis is at right angles to the screen.
Mark the screen with a horizontal line 88 ÷ 90 cm. from the ground.
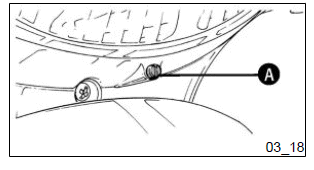
Start the engine, switch on the headlight dipped beam and position it so that the boundary between the brightly illuminated area and the surrounding area is no higher than the line you have drawn. To change the position of the headlamp turn the screw "A" on the front of the unit as shown in figure 1. Before adjusting the headlamp angle, make sure the tyres are inflated to the pressure specified on pneumatic section.
See also:
 Piaggio Liberty 50 - Owner's Manual > Checking the brake oil level
The brake fluid reservoir is equipped with a sight glass "A" made of transparent material; the quantity of liquid contained in the sight glass indicates the level of liquid in the reservoir.
Piaggio Liberty 50 - Owner's Manual > Front direction indicators
Use a Phillips screwdriver on the screw "C" shown in the figure. The bulb has a bayonet fitting, to remove it press gently, and turn it anticlockwise about 30º and then withdraw it. To refit follow the same steps but in reverse order.
 BMW R 1250 RT
 Kymco Agility 50
 Piaggio Liberty 50
 Yamaha aerox NS50
 Aprilia SR50R
 Kymco Agility 50
 Vespa Primavera 50
 Peugeot Speedfight