 Yamaha aerox NS50 - Owner's Manual > Multi-function display (NS50)
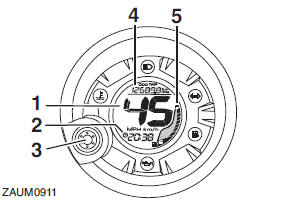
- Speedometer
- Clock
- "RESET/SELECT" button
- Odometer/tripmeters/fuel reserve tripmeter
- Fuel gauge
TIP
The multi-function display performs the following self-test for three seconds in order to check the electrical circuit.
- The speedometer digits display from 0 to 80, and then from 80 to 0 in kilometers. If the speedometer is set to miles, the digits will display from 0 to 50, and then from 50 to 0.
- All LCD segments and warning lights come on and then go off.
WARNING
Be sure to stop the vehicle before making any setting changes to the multi-function display. Changing settings while riding can distract the operator and increase the risk of an accident.
The multi-function display is equipped with the following:
- a digital clock
- a digital speedometer (which shows riding speed)
- an odometer (which shows the total distance traveled)
- a tripmeter (which shows the distance traveled since it was last set to zero)
- a fuel reserve tripmeter (which shows the distance traveled on the fuel reserve)
- a fuel gauge
- a self-diagnosis device
TIP
- Be sure to turn the key to "
 " before
using the "RESET/SELECT"
button.
" before
using the "RESET/SELECT"
button. - For the U.K. only: To switch the
speedometer and odometer/tripmeter
displays between kilometers
and miles, when the main switch is
turned to " ", press the "RESET/
SELECT" button for at least
eight seconds.
To set the clock:
1. Select the odometer and push the "RESET/SELECT" button for at least three seconds.
2. When the hour digits start flashing, push the "RESET/SELECT" button to set the hours.
3. To change the minutes digits, push the "RESET/SELECT" button for at least three seconds.
4. When the minutes digits start flashing, push the "RESET/SELECT" button to set the minutes.
5. Push the "RESET/SELECT" button for at least three seconds to start the clock.
TIP
After setting the clock, be sure to push
the "RESET/SELECT" button for at
least three seconds before turning the
key to "  ", otherwise the clock
will not
be set.
", otherwise the clock
will not
be set.
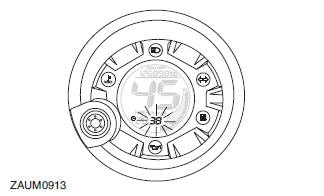
Odometer and tripmeter modes
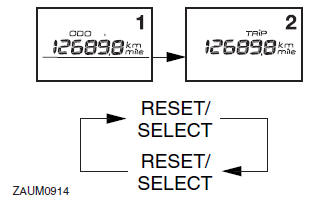
Pushing the "RESET/SELECT" button switches the display between the odometer mode "ODO" and the tripmeter "TRIP" in the following order: ODO → TRIP → ODO
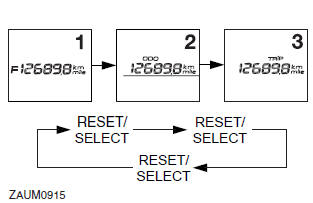
If the fuel level warning indicator comes on , the odometer display will automatically change to the fuel reserve tripmeter mode "TRIP F" and start counting the distance traveled from that point. In that case, pushing the "RESET/SELECT" button switches the display between the various tripmeter and odometer modes in the following order: TRIP F → ODO → TRIP → TRIP F
To reset a tripmeter, select it by pushing the "RESET/SELECT" button, and then push it again for at least three seconds.
If you do not reset the fuel reserve tripmeter manually, it will reset itself automatically and the display will return to the prior mode after refueling and traveling 5 km (3 mi).
TIP
The display cannot be changed back to "TRIP F" after pushing the "RESET/SELECT" button.
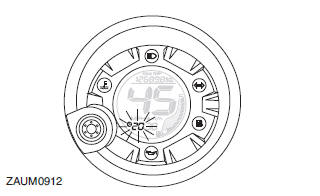
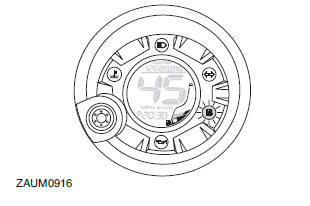
Fuel gauge
The fuel gauge indicates the amount of fuel in the fuel tank. The display segments of the fuel gauge disappear towards "E" (Empty) as the fuel level decreases. When only one segment is left near "E", the fuel level warning indicator comes on. Refuel as soon as possible.
TIP
The display segment containing the letter 'E' (Empty) stays on continuously and is not an indicator of fuel level in the fuel tank.
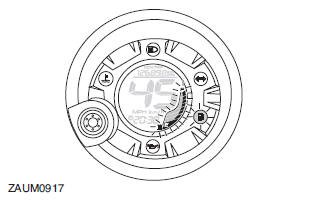
Self-diagnosis device
This model is equipped with a self-diagnosis device for the fuel electrical circuit.
If a problem is detected in the fuel electrical circuit, all LCD segments of the fuel gauge and the fuel level warning indicator will flash alternately. If this occurs, have a Yamaha dealer check the vehicle.
See also:
 Yamaha aerox NS50 - Owner's Manual > Main switch/steering lock
The main switch/steering lock controls the ignition and lighting systems, and is used to lock the steering. The various positions are described below.
Yamaha aerox NS50 - Owner's Manual > Handlebar switches
Left Horn switch " " Turn signal switch " " Dimmer switch " "
 BMW R 1250 RT
 Kymco Agility 50
 Piaggio Liberty 50
 Yamaha aerox NS50
 Aprilia SR50R
 Kymco Agility 50
 Vespa Primavera 50
 Peugeot Speedfight