 BMW R 1250 RT - Owner's Manual > Gearshift lever
- with Option 719 Milled Part Set Classic OE
or
- with Option 719 Milled Part Set Storm OE
or
- with HP milled part package OE
Adjusting gearshift lever peg
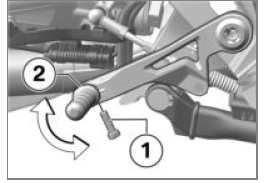
- Foot distance and height to peg 2 can be adjusted by turning to different positions.
- Remove the bolt 1.
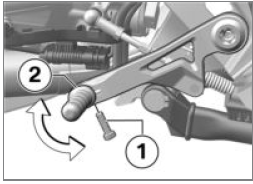
- Clean the threads.
- Turn the peg 2 in the desired position.
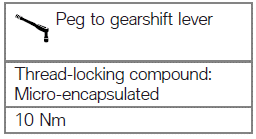
- Fit new bolt 1.
Brakes
Adjust the handbrake lever
WARNING Adjusting the brake lever while riding
Risk of accident
- Do not attempt to adjust the brake lever unless the motorcycle is at a standstill.
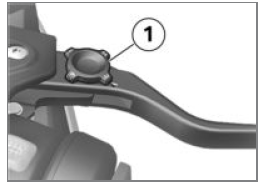
- Turn adjuster knob 1 to the desired position.
NOTICE The adjuster is easier to turn if you push the brake lever forward.
- Four settings are possible:
- Position 1: Smallest distance between handlebar grip and brake lever.
- Position 4: Largest distance between handlebar grip and brake lever.
- with Option 719 Milled Part Set Classic OE
or
- with Option 719 Milled Part Set Storm OE
or
- with HP milled part package OE
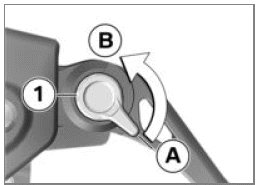
- Turn the adjustment lever 1 into the desired position.
- Adjustment options:
- From position A: narrowest span between handlebar grip and handbrake lever.
- In 5 steps in direction of position B for enlarging the distance between handlebar grip and handbrake lever.
Adjust footbrake lever peg
- with Option 719 Milled Part Set Classic OE
or
- with Option 719 Milled Part Set Storm OE
or
- with HP milled part package OE
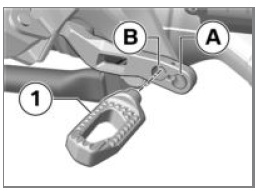
- Foot distance and height to peg 1 can be adjusted by turning through 180º and installation in position A or B.
- Remove the bolt 1.
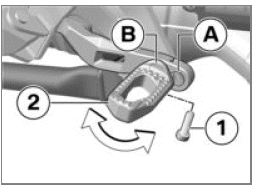
- Clean the threads.
- Install peg 2 in desired position A or B.
- Turn the peg 2 in the desired position.
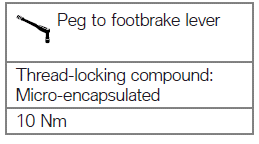
- Fit new bolt 1.
Spring preload
Adjustment
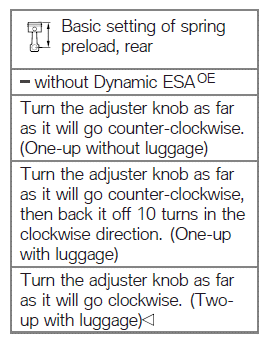
It is essential to set spring preload of the rear suspension to suit the load carried by the motorcycle.
Increase spring preload when the vehicle is heavily loaded and reduce spring preload accordingly when the vehicle is lightly loaded.
Adjusting spring preload for rear wheel
WARNING Adjusting spring preload while riding.
Risk of accident
- Do not attempt to adjust spring preload unless the motorcycle is at a standstill.
- Make sure the ground is level and firm and place the motorcycle on its stand.
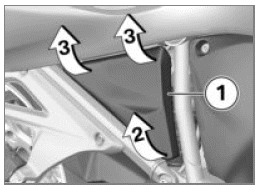
- Ease out bottom of cover 1 at position 2.
- In order not to damage the cover or the mounts, disengage the cover at positions 3.
WARNING Spring preload setting and spring-strut damping setting not matched.
Impaired handling.
- Adjust spring-strut damping to suit spring preload.
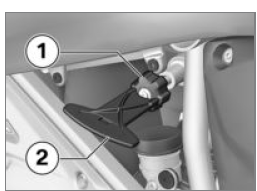
- If you want to increase spring preload, use tool 2 (on-board toolkit) to
turn knob 1 clockwise.
If you want to reduce spring preload, use tool 2 to turn knob 1 counter-clockwise.
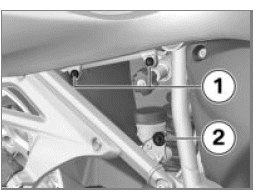
- Seat the cover in mount 2 and press it into mounts 1.
Damping
Adjustment
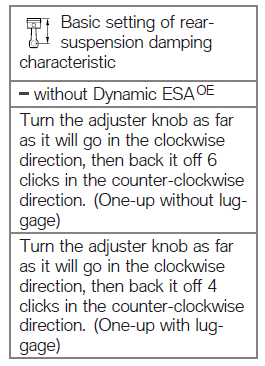
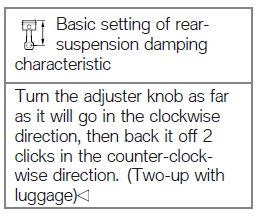
Damping must be adapted to suit the surface on which the motorcycle is ridden and to suit spring preload.
- An uneven surface requires softer damping than a smooth surface.
- An increase in spring preload requires firmer damping, a reduction in spring preload requires softer damping.
Adjusting the damping characteristic for rear wheel
- Place the motorcycle on its stand on firm, even ground.
- Set the damping from the left-hand vehicle side.
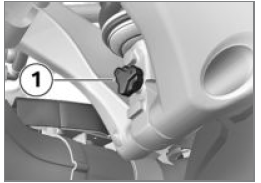
- Turn the adjusting screw 1 clockwise to harden the damping action.
- Turn the adjusting screw 1 anticlockwise to soften the damping action.
NOTICE BMW Motorrad recommends selecting one-up operation with luggage for special vehicles.
See also:
 BMW R 1250 RT - Owner's Manual > Mirrors
Adjusting mirrors Pivot the mirror to the correct position by pressing gently at the edge of the glass.
 BMW R 1250 RT
 Kymco Agility 50
 Piaggio Liberty 50
 Yamaha aerox NS50
 Aprilia SR50R
 Kymco Agility 50
 Vespa Primavera 50
 Peugeot Speedfight