 BMW R 1250 RT - Owner's Manual > Mirrors
Adjusting mirrors
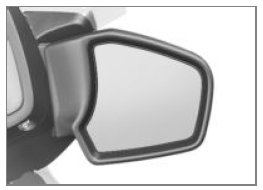
- Pivot the mirror to the correct position by pressing gently at the edge of the glass.
Headlight
Headlight beam throw and spring setting
The headlight beam throw generally remains constant due to adjustment of the spring setting.
Adjustment of the spring setting may only be inadequate if the load is very high. In this case, the headlight beam throw must be adjusted to the weight.
NOTICE If there are doubts about the correct headlight beam throw, have the setting checked by a specialist workshop, preferably an authorised BMW Motorrad dealer.
Adjusting headlight beam throw
Requirement
If, with a high load, the adjustment of the spring setting is no longer sufficient not to dazzle oncoming traffic:
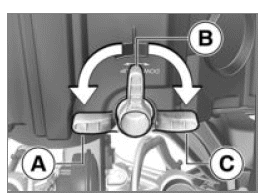
- The headlight beam-throw is adjusted via a bell crank.
- Position with a light load (only rider)
- Position with rider with load
- Position with high load (with two-up mode)
Windscreen
Adjusting windscreen
- Switch on the ignition.
- As you ride off, the windscreen automatically moves to its last position before the ignition was switched off.
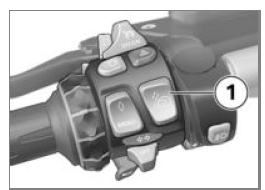
- Press the upper section of button 1 to raise the windscreen.
- Press the lower section of button 1 to lower the windscreen.
- Switch off the ignition.
- The windscreen automatically moves to the bottom end position.
- The anti-trap mechanism activates if the windscreen encounters resistance prior to reaching the end position. The windscreen stops and the mechanism raises it slightly. After a few seconds the windscreen once again attempts to move to the bottom end position.
Correct anti-trap mechanism functionality cannot be guaranteed if a windscreen has been installed that has not been approved by BMW Motorrad.
- In this case: Ensure the clearance of the windscreen prior to switching off the ignition.
Instrument panel
Adjusting instrument panel
NOTICE Do not attempt to adjust the position of the instrument panel unless the vehicle is at a standstill.
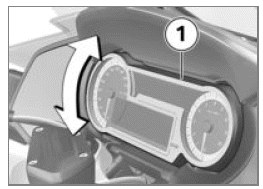
- Press instrument panel 1 firmly at top or bottom edge, as applicable, to move it to the desired position. Be sure to apply pressure midway along the edge in order to ensure that movement is the same at both sides.
Clutch
Adjust the clutch lever
WARNING Adjusting the clutch lever while riding
Risk of accident
- Adjust the clutch lever only when the motorcycle is at a standstill.
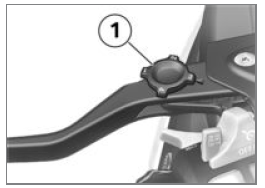
- Turn adjuster knob 1 to the desired position.
NOTICE The adjuster is easier to turn if you push the clutch lever forward.
- Four settings are possible:
- Position 1: smallest distance between handlebar grip and clutch lever
- Position 4: largest distance between handlebar grip and clutch lever
- with Option 719 Milled Part Set Classic OE
or
- with Option 719 Milled Part Set Storm OE
or
- with HP milled part package OE
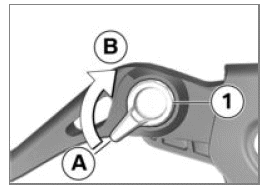
- Turn the adjustment lever 1 into the desired position.
- Adjustment options:
- From position A: narrowest span between handlebar grip and clutch lever.
- In 5 steps in direction of position B for enlarging the distance between handlebar grip and clutch lever.
See also:
 BMW R 1250 RT - Owner's Manual > Gearshift lever
- with Option 719 Milled Part Set Classic OE or - with Option 719 Milled Part Set Storm OE or - with HP milled part package OE Adjusting gearshift lever peg Foot distance and height to peg 2 can be adjusted by turning to different positions. Remove the bolt 1. Clean the threads. Turn the peg 2 in the desired position. Fit new bolt 1.
 BMW R 1250 RT
 Kymco Agility 50
 Piaggio Liberty 50
 Yamaha aerox NS50
 Aprilia SR50R
 Kymco Agility 50
 Vespa Primavera 50
 Peugeot Speedfight