 Aprilia SR50R - Service manual > Specifications
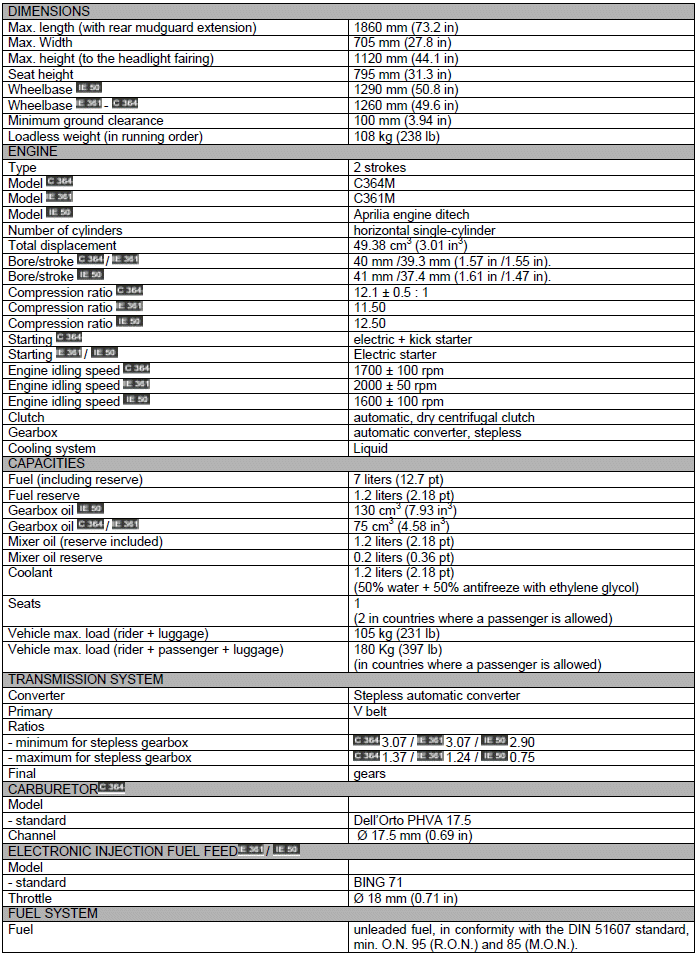
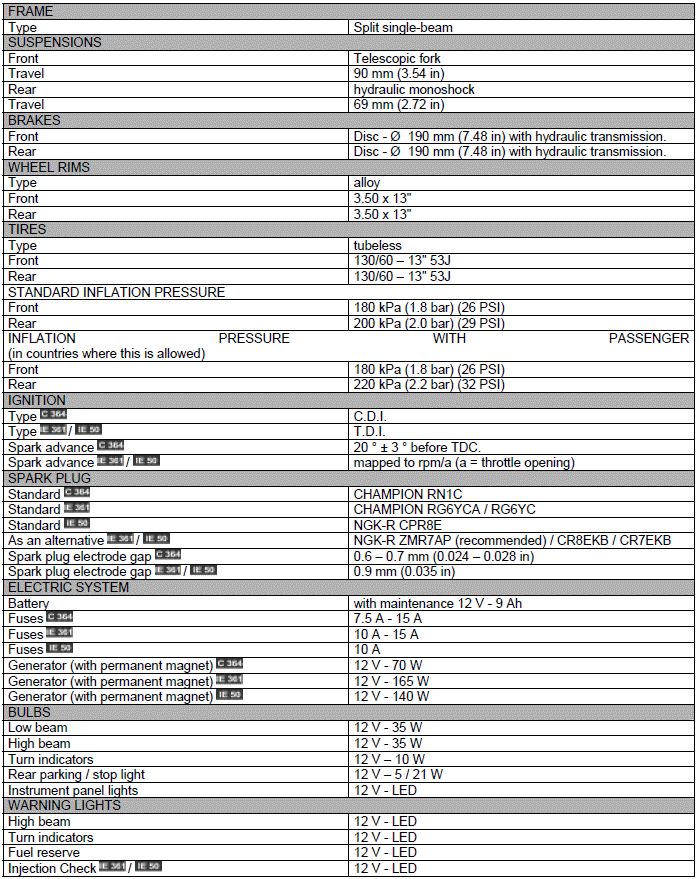
TECHNICAL DATA
SCHEDULED MAINTENANCE CHART
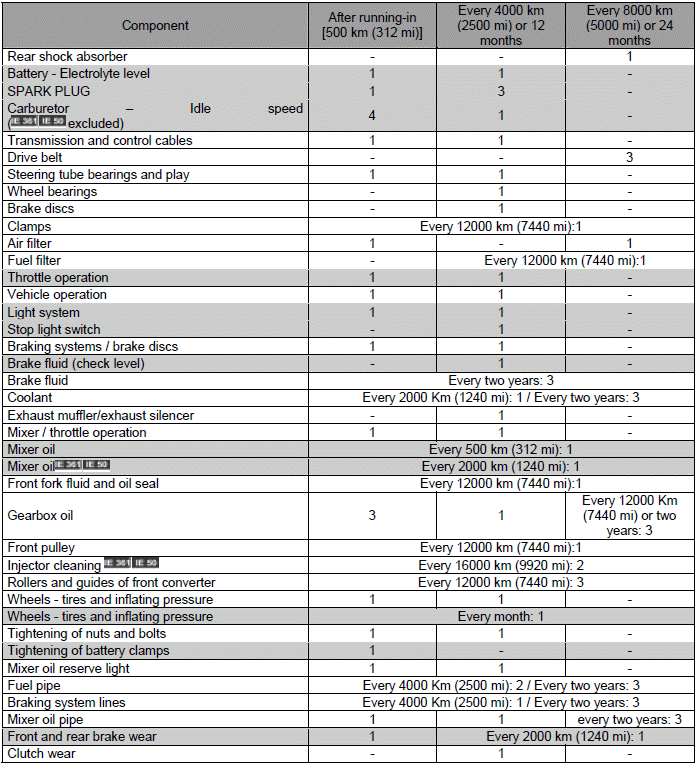
- check and clean, adjust, lubricate or change, if necessary;
- clean;
- replace;
- adjust.
Carry out the maintenance operations more frequently if you use the vehicle in rainy and dusty areas or on uneven ground.
( )
= OPERATIONS THAT CAN BE CARRIED OUT BY THE USER
)
= OPERATIONS THAT CAN BE CARRIED OUT BY THE USER
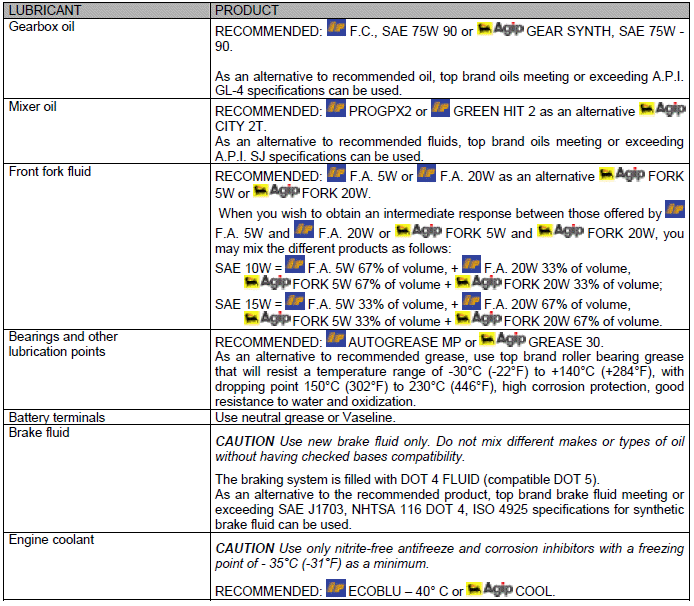
LUBRICANT TABLE
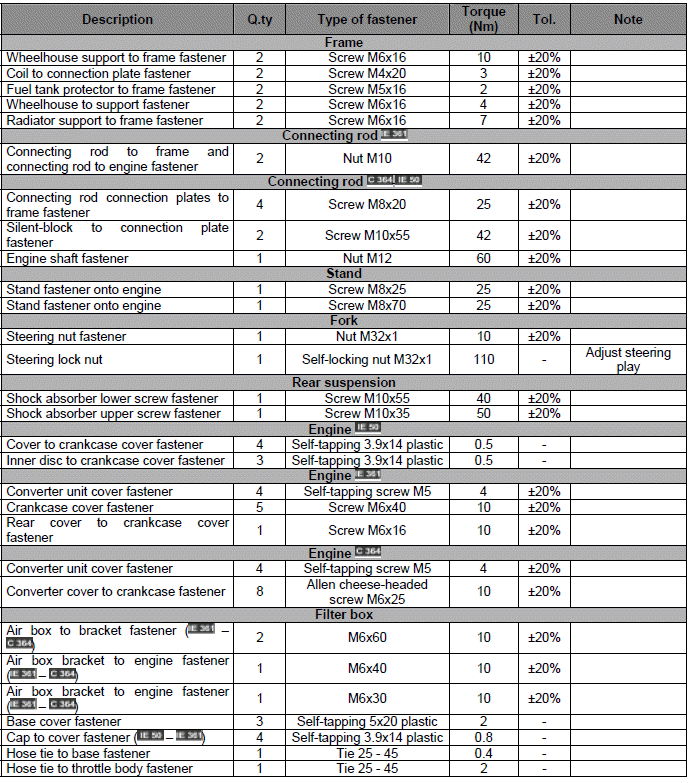
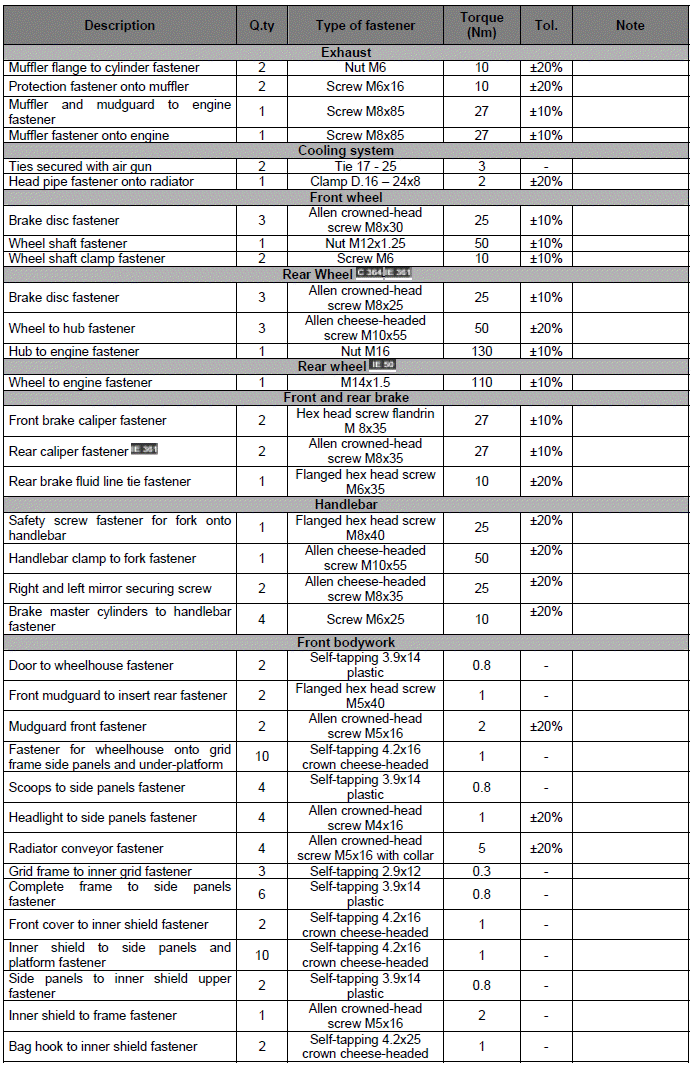
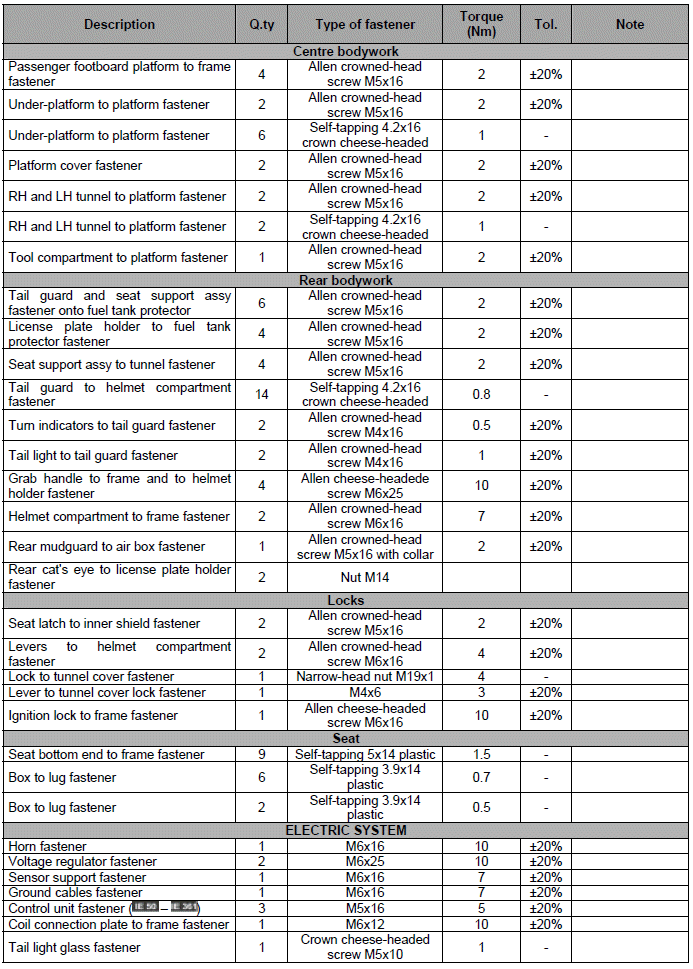
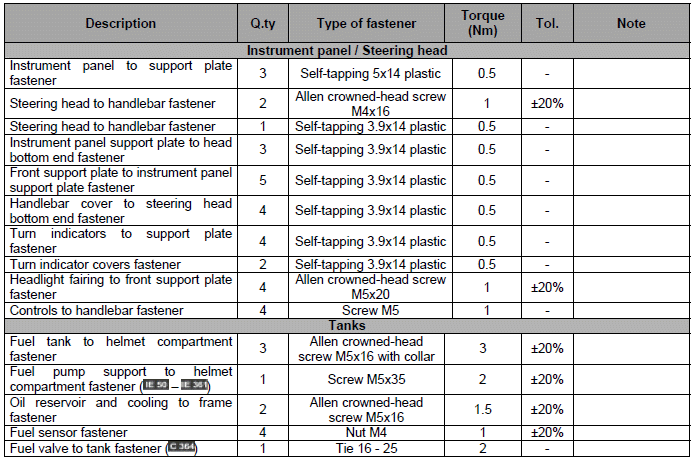
TIGHTENING TORQUES
WARNING The fastening elements listed should be tightened to the specified torque using a torque wrench and applying LOCTITE where indicated.
MULTIFUNCTION DIGITAL COMPUTER IE 361 IE 50
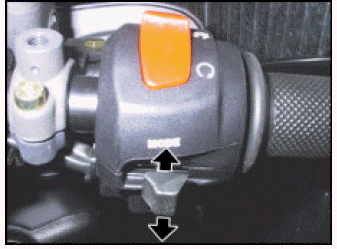
Using the MODE joystick
Using the MODE joystick on the RH handlebar, it is possible to choose various functions in sequence; move the MODE joystick to the right or to the left (UP/DOWN) to scroll the functions, select the function by pressing rapidly, confirm data by pressing for a longer period.

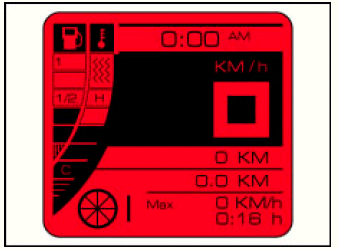
Multifunction indicator functions
Move the UP/DOWN joystick to display the sequence of the various functions:
TRIP 1 ! TRIP 2 ! BATTERY VOLTAGE ! CHRONOMETER ! MENU.
TRIP1 - TRIP2 functions
The two pages display two stored values for: trip meter, average speed, maximum speed.
The values can be reset by holding down the MODE joystick for a certain time.
Battery Voltage function
Battery voltage is displayed.

Chronometer function
Quickly press the MODE joystick to start the chronometer.
If the MODE joystick is pressed before 10 seconds have elapsed since chronometer start, the current measure is cancelled and a new one is started.
If the MODE joystick is pressed after 10 seconds have elapsed since chronometer start, the current measure is stopped, stored and a new one is started.
Hold down the MODE joystick for a certain time to stop the measurements.
It is possible to store up to 16 times in a row, that can be displayed on the CHRONOMETER screen under the Menu function (see Menu Function).

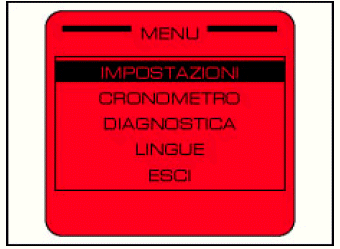
Menu function
Press the MODE joystick for a certain time to enter the Menu. Press the MODE joystick again to access the SETTINGS, CHRONOMETER, DIAGNOSTICS and LANGUAGE sub-menus.
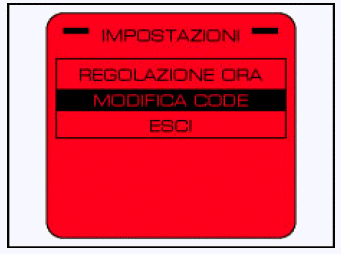
SETTINGS sub-menu: this menu allows:
- Time setting: (from the SETTINGS menu) briefly press the MODE joystick
to enter the setting function.
Set the time using the UP/DOWN joystick, confirm it with the MODE joystick. Using the UP/DOWN joystick shift to minutes, confirm the set value with the MODE joystick .
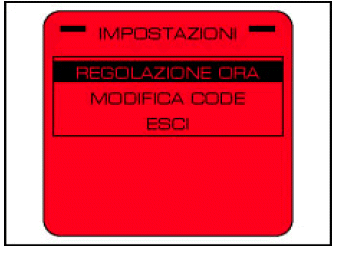
- Code change: (from the SETTINGS menu) shortly press on the MODE joystick
to enter the function for setting the 5-digit safety code.
Set the first digit using the UP/DOWN joystick, confirm it with the MODE joystick. Then set the following digit.
CAUTION The safety code will be necessary to start the vehicle with a key that is not fitted with a transponder or in any case not initialized on the vehicle.
The safety code stored on any new vehicle is 00000.
Every time a new vehicle is started, the instrument panel displays a warning prompting the rider to customize the safety code. We recoomend you set the standard code with your personal one, take note of the new code and keep it in a safe place, not on the scooter itself, and remember to give it to the new owner in case of sale.
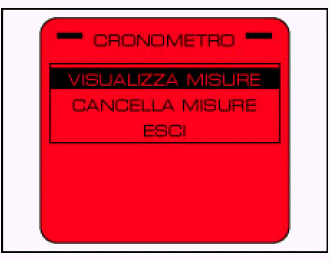
- CHRONOMETER sub-menu: this menu allows:
DISPLAY: enter this menu to display the times recorded using the Chronometer function. Briefly press the MODE joystick to quit time display mode.
DELETE: enter this menu to delete the times recorded using the Chronometer function. All values can be deleted by holding down the MODE joystick for a certain time.
- DIAGNOSTICS sub-menu: this menu allows you to perform diagnosis and service operations.
WARNING To gain access to this area it is necessary to enter the specific SERVICE CODE of this vehicle.
The SERVICE CODE should never be disclosed to the end user, it is intended for use by the aprilia Authorized Dealers only.
Using the MODE joystick, enter the vehicle SERVICE CODE: 45256.
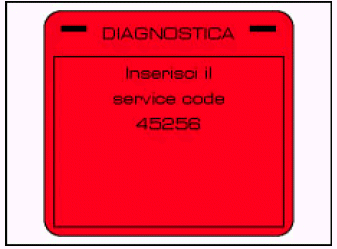
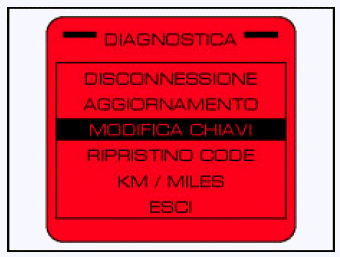
You gain access to the diagnostics menu:
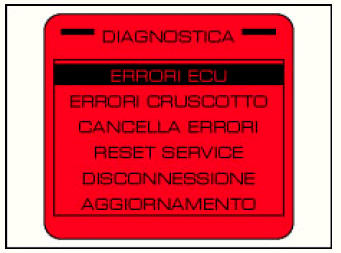
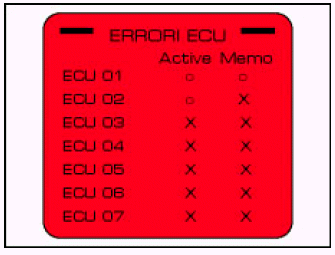
ECU ERRORS: This menu allows you to view any current errors (active) or stored (memo) as detected by the ECU.
The presence of an error is indicated by "x".
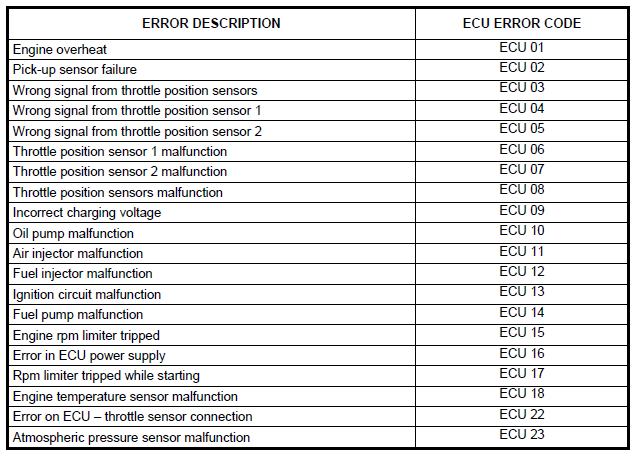
To identify the error, please refer to the ECU error codes table.
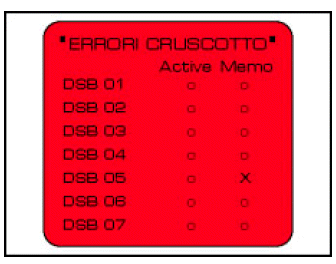
INSTRUMENT PANEL ERRORS: This menu allows you to view any current errors (active) or stored (memo) as detected by the instrument panel.
The presence of an error is indicated by "x".
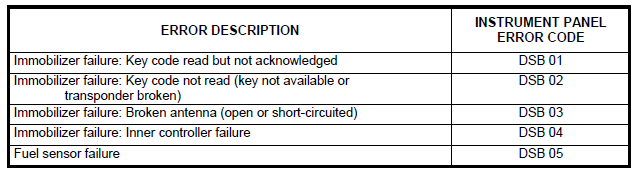
To identify the error, please refer to the instrument panel error codes table.
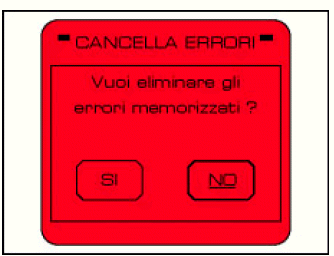
DELETE ERRORS: Select this function to delete the errors detected by the ECU and the instrument panel.
RESET SERVICE: Select this function to reset the SERVICE warning after the necessary maintenance has been carried out.

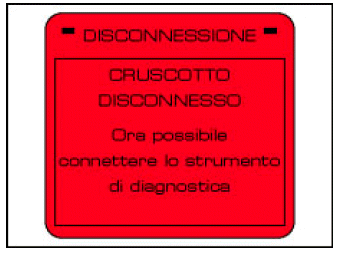
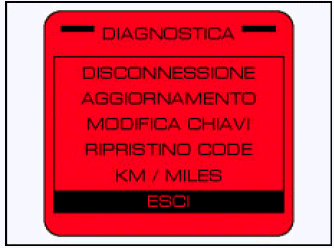
DISCONNECT: Select this function to cut the instrument panel- ECU connection.
WARNING This operation is necessary before connecting to the ECU with AXONE or GAMEBOY, in order to avoid disturbances in data transmission across the ECU and diagnosis instrument.
UPDATE: Select this function to cut the instrument panel- ECU connection and preset the instrument panel for uploading a new software through AXONE. The code of the software currently loaded in the instrument panel is in brackets.

CHANGE KEYS: The instrument panel manages the immobilizer function through encoded keys. In case the keys are lost or the kill switch is changed, it is possible to encode up to 4 keys using this procedure.
At the beginning of the procedure you will be prompted to enter the USER CODE.
WARNING The user code stored on a new vehicle is 00000.
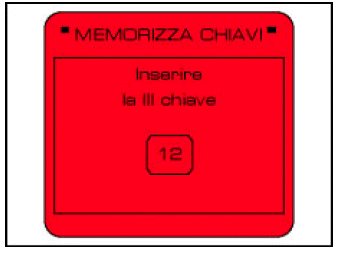
The instrument panel prompts you to insert the first key:
WARNING The first key is the one already inserted. Wait for the key to be stored and the second key to be requested.
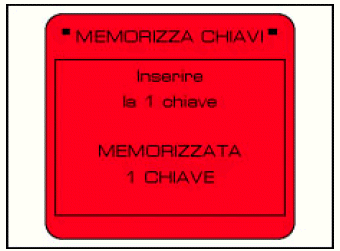
Insert the second key within twenty seconds from the request.
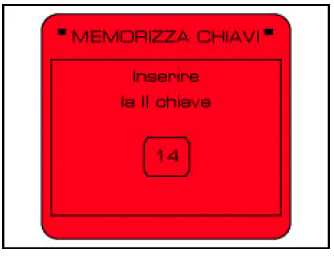
Proceed with the other keys or let the countdown reach zero to end the operation.
RESTORE CODE: If the user forgets the USER CODE, it is possible to insert a new code through the Restore Code function.
WARNING This procedure irreversibly deletes the previous User Code.

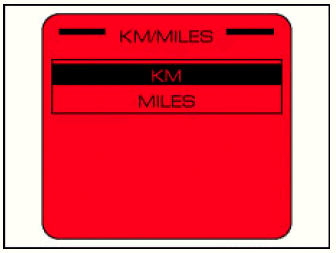
KM/MILES: use this function to select the unit of measurement for the Tachometer / Odometer.
ESC: Select this item to quit the diagnosis environment.
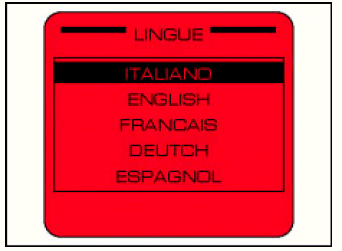
- LANGUAGE FUNCTION sub-menu: choose the desired language from this menu.
Briefly press the MODE button to enter, use the UP and DOWN keys to choose the desired language among the available ones and set it by pressing the MODE key for a certain time.
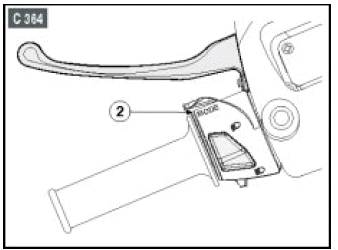
MULTIFUNCTION DIGITAL COMPUTER C 364
Multifunction indicator functions
Use the Mode button (2), on the LH handlebar, to select among various functions: clock setting, odometer (ODO), trip meter (TRIP), battery voltage value and trip meter reset.
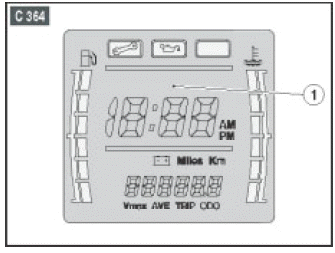
Odometer (ODO).
When the instrument panel is switched on, the multifunction display (1) shows the odometer function (ODO).
TRIP.
With the odometer display (ODO), press the Mode button (2) once to display the function (TRIP). Hold down the Mode button (2) for at least three seconds to reset the stored trip value.
Battery voltage.
With the odometer display, press the Mode button (2) twice to display the battery function.
Conversion of unit of measurement - Km/Mi
When the battery voltage is shown on the multifunction display (1), hold down the Mode button (2) for more than ten seconds to change the unit of measurement from kilometers (Km) to miles (Mi). While pressing the button, the current unit of measurement will flash. Should the button be pressed for less than ten seconds, the conversion will not take place.
Setting the clock
CAUTION For safety reasons, it is possible to set this function only when the vehicle is stopped.
Hold down the Mode button (2) for at least three seconds.
The column dividing hours and minutes will start flashing.
Set the hour value, it will increase by one unit every time you press the Mode button (2).
Hold down the Mode button (2) again for at least three seconds to shift to the minute setting. The indicated value will increase by one unit every time the Mode button (2) is pressed.
Hold down the Mode button (2) for at least three seconds to go back to the hour setting.
If no key has been touched for three seconds, the display will automatically quit the clock setting function.
See also:
 Aprilia SR50R - Service manual > Scheduled Maintenance
BRAKE SYSTEM WARNING In case of excessive stroke of the brake lever, excessive elasticity or air bubbles, bleed the air out of the circuit. Do not use or mix different types of silicone or oil fluids.
 BMW R 1250 RT
 Kymco Agility 50
 Piaggio Liberty 50
 Yamaha aerox NS50
 Aprilia SR50R
 Kymco Agility 50
 Vespa Primavera 50
 Peugeot Speedfight