 Piaggio Liberty 50 - Owner's Manual > Technical data
SPECIFICATIONS
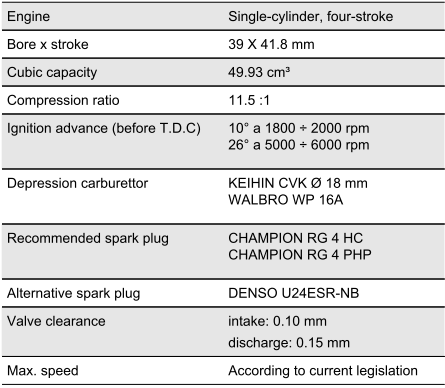
DATA


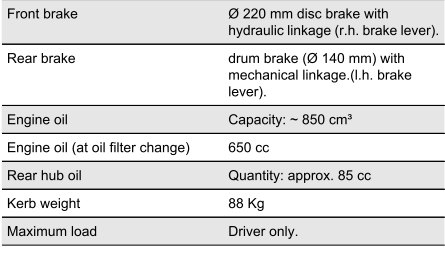
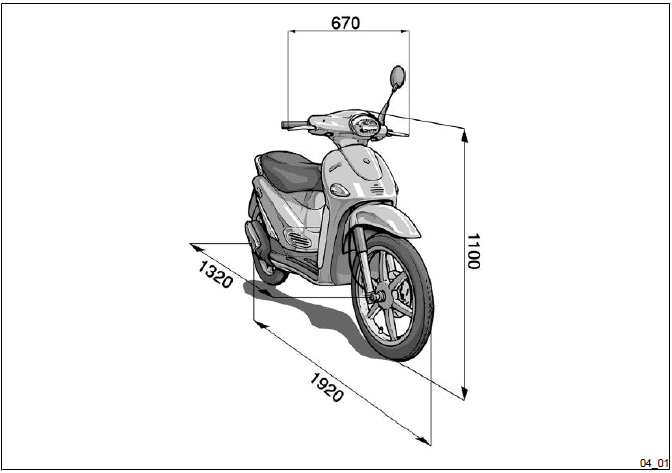
Toolkit
One box spanner (16 mm); a 10-13 mm double spanner; one double screwdriver; a 6 mm hex spanner. The tools are stored under the saddle. To pull the tools out of their housing, disengage the lever and then remove the strap.
Spare parts and accessories
Warnings
WARNING
IT IS RECOMMENDED THAT "ORIGINAL PIAGGIO SPARE PARTS" BE USED, AS THESE ARE THE ONLY ONES OFFERING YOU THE SAME QUALITY ASSURANCE AS THOSE INITIALLY FITTED ON THE VEHICLE.
IT SHOULD BE REMEMBERED THAT USING NON-ORIGINAL SPARE PARTS CAUSES YOUR WARRANTY RIGHTS TO EXPIRE.
WARNING
PIAGGIO MARKETS ITS OWN LINE OF ACCESSORIES THAT ARE RECOGNISED AND GUARANTEED FOR USE. IT IS THEREFORE ESSENTIAL TO CONTACT AN AUTHORISED DEALER OR SERVICE CENTRE IN ORDER TO CHOOSE AND FIT ACCESSORIES CORRECTLY. THE USE OF NON-ORIGINAL ACCESSORIES MAY AFFECT THE STABILITY AND OPERATION OF YOUR VEHICLE AND REDUCE SAFETY LEVELS WITH POTENTIAL RISKS FOR THE RIDER.
Scheduled maintenance
Scheduled servicing table
Adequate maintenance is fundamental to ensuring long-lasting, optimum operation and performance of your vehicle.
To this end, a series of checks and maintenance operations (at the owner's expense) have been suggested, which are included in the summary table on the following page.
Any minor faults should be reported without delay to an Authorised Service Centre or Dealer without waiting until the next scheduled service to solve it.
It is indispensable to have your vehicle serviced to the prescribed intervals of time, even if you have not reached the predicted mileage. Punctual vehicle servicing is necessary for the correct use of the guarantee. For any further information concerning Warranty procedures and 'Scheduled Maintenance', please refer to the 'Warranty Booklet'.
SCHEDULED MAINTENANCE TABLE
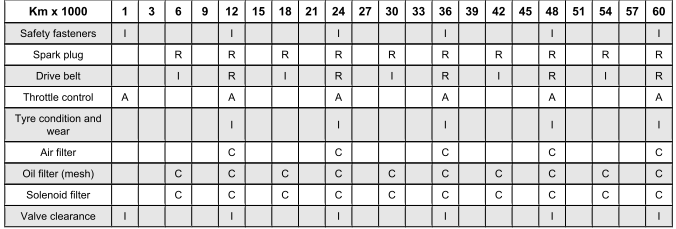
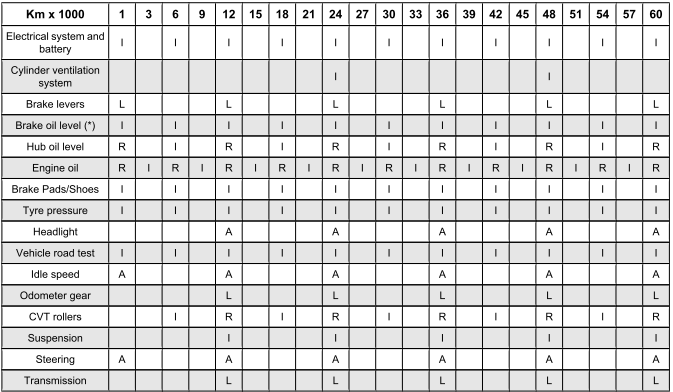
I: CHECK AND CLEAN, ADJUST, LUBRICATE OR REPLACE IF NECESSARY.
C: CLEAN, R: REPLACE, A: ADJUST, L: LUBRICATE
* Replace every 2 years
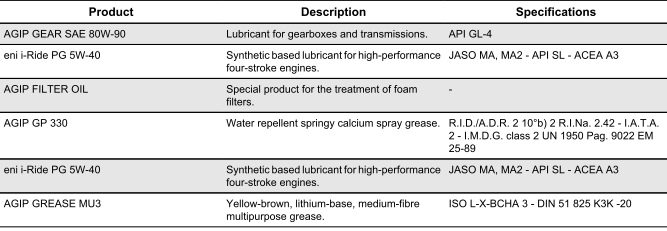
TABLE OF RECOMMENDED PRODUCTS
See also:
 Piaggio Liberty 50 - Owner's Manual > Rear drum brake
Actuate on the set screw "A" indicated on the figure bearing in mind that the wheel must rotate freely when the control lever is in neutral.
 BMW R 1250 RT
 Kymco Agility 50
 Piaggio Liberty 50
 Yamaha aerox NS50
 Aprilia SR50R
 Kymco Agility 50
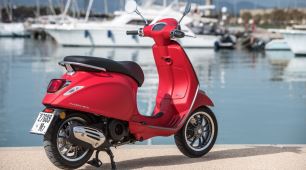 Vespa Primavera 50
 Peugeot Speedfight