 Vespa Primavera 50 - Service manual > Braking system
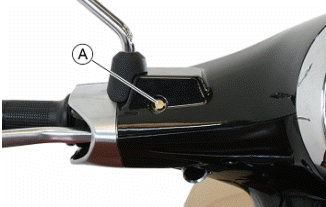
Level check
Proceed as follows:
- Rest the vehicle on its centre stand with the handlebars perfectly horizontal;
- Check the level of liquid with the related warning light "A".
A certain lowering of the level is caused by wear on the brake pads.
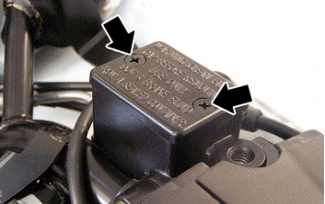
Top-up
Proceed as follows:
- Remove the upper handlebar cover.
- Remove the reservoir cap by loosening the two screws, remove the gasket and top-up using only the fluid specified without exceeding the maximum level.
CAUTION
ONLY USE DOT 4-CLASSIFIED BRAKE FLUID.
CAUTION
MAKE SURE THE BRAKE FLUID DOES NOT GET INTO YOUR EYES OR ON YOUR SKIN OR CLOTHES. IF THIS HAPPENS ACCIDENTALLY, WASH WITH WATER.
CAUTION
BRAKE CIRCUIT FLUID IS VERY CORROSIVE; DO NOT LET IT COME INTO CONTACT WITH THE PAINTED PARTS.
CAUTION
BRAKE FLUID IS HYGROSCOPIC; THAT IS, IT ABSORBS MOISTURE FROM THE SURROUNDING AIR. IF THE CONTENT OF MOISTURE IN THE BRAKE FLUID EXCEEDS A CERTAIN VALUE, BRAKING WILL BE INEFFICIENT.
NEVER USE BRAKE FLUID FROM OPEN OR PARTIALLY USED CONTAINERS.
UNDER NORMAL CLIMATIC CONDITIONS, REPLACE FLUID AS INDICATED IN THE SCHEDULED MAINTENANCE TABLE.
N.B.
SEE THE BRAKING SYSTEM CHAPTER WITH REGARD TO THE CHANGING OF BRAKE FLUID AND THE BLEEDING OF AIR FROM THE CIRCUITS.
Recommended products
AGIP BRAKE 4 Brake fluid.
SAE J 1703 -FMVSS 116 - DOT 3/4 - ISO 4925 - CUNA NC 956 DOT 4 synthetic fluid
Locking torques (N*m)
Brake pump reservoir screws 15 to 20
Headlight adjustment
Proceed as follows:
1. Position the vehicle in running order and with the tyres inflated to the prescribed pressure, onto a flat surface 10 m away from a half-lit white screen; ensure that the longitudinal axis of the vehicle is perpendicular to the screen;
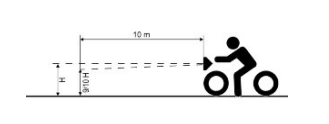
2. Turn on the headlight and check that the boundary of the light beam projected onto the screen is not higher than 9/10 or lower than 7/10 of the distance between the centre of the headlight and the ground;
3. Otherwise, adjust the right headlight with screw "A".
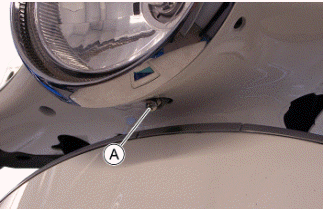
N.B.
THE ABOVE PROCEDURE COMPLIES WITH THE EUROPEAN STANDARDS REGARDING MAXIMUM AND MINIMUM HEIGHT OF LIGHT BEAMS. REFER TO THE STATUTORY REGULATIONS IN FORCE IN EVERY COUNTRY WHERE THE VEHICLE IS USED.
Anti-evaporation system
Canister inspection
The canister is essential to treat the hydrocarbons present in the volume of gas that escapes from the tank when there is an increase in internal pressure (tank heating induced by the cooling radiator, by the motor or by the external environment).
The volume of air is limited by the operation of the ventilation valve (Roll-over).
Although the amount of hydrocarbons coming from the tank is small enough to avoid the saturation of the canister, it is necessary to regenerate the activated carbon by means of a reversed flow of ambient air sucked by the engine.
These vacuums of pollution and carbon regeneration take place at each cycle of use of the vehicle.
To control the canister, it is necessary to proceed with its removal while keeping the 2 pipes connected.
- Shake the Canister and make sure there is no noise.
- Using a compressed air gun, blow alternately in 3 ducts and make sure that pressure does not build inside the canister.
- Check that the air flow is kept free and that no carbon residues escape out of any pipe.
If you detect noise, clogging or loss of carbon, replace the canister.
Safety valve check
The cleaning of the canister is achieved via a controlled flow of air from the vacuum socket in the intake manifold.
To ensure that the engine works properly, it is necessary that the flow of air is not too intense, this is achieved by means of a restricted section 0.0354in (0.9 mm) formed in the socket on the intake manifold.
The relative connecting pipe with the canister, includes the installation of the safety valve.
This is a one-way valve which ensures the passage of air in the direction of the manifold when the control vacuum is greater than 2.9PSI (20kPa) (200mbar).
The vacuum of the engine at idle, causes a slight flow of air easily compensated by the idle speed adjustment parameters.
When the vehicle is stopped, the safety valve will be closed due to the lack of control vacuum therefore, any expansion of the fuel tank, will not cause pollution of the intake manifold, and then cause flooding of the engine.
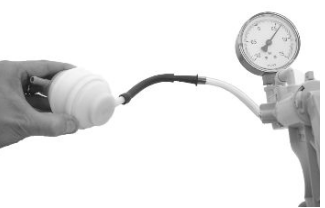
To control the valve, it is preferable to it, alternatively just access the manifold side pipe.
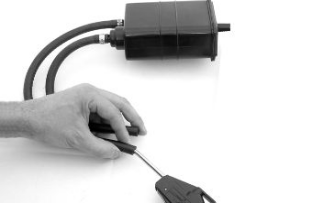
- Connect the MITY-VAC pump on the engine side duct.
- Select the pump command on the "vacuum" position, then slowly apply vacuum up to the valve threshold check opening.
If you detect different pressures, replace the valve.
N.B. An opening vacuum that is too high, causes a lack of regeneration of the activated carbon; vice versa, an opening vacuum that is too low, increases the flow of air to the engine causing the thinning of idle.
Characteristic
Standard opening vacuum
(2.90-3.77)PSI (20-26)kPa (200-260)mbar
Roll-over valve check
The valve must enable the following results:
- Aeration of the tank while riding (the ambient air enters the tank in relation to the volume of fuel used).
- Pressurisation of the tank (while riding or during a break, you may experience increases in the temperature inside the tank. The valve must pressurize the tank to limit the escape of fuel vapour to the canister).
- Prevent pollution of the canister with the liquid fuel (in case of fall of the vehicle, the valve must block the connection with the canister).
To control the valve, it is necessary to remove it from the vehicle.
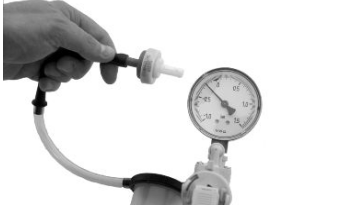
For the check, it is planned to use a MITY-VAC pump and a piece of tube, then proceed as follows:
- Connect the MITY-VAC pump to the lower joint of the safety valve (white).
- Select the "vacuum" control position and keeping the valve in the vertical axis, check that it is possible to intake air without movements of the gauge needle.
- Switch the control of the pump to "pressure" and, keeping the valve in the vertical axis, check that it is possible to pressurise the valve up to values slightly below 1.45PSI(~0.87PSI) 10kPa(~6kPa) 100mbar(~60mbar).
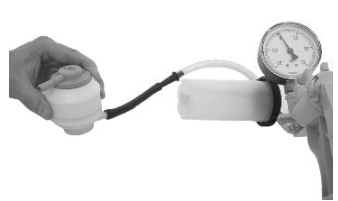
N.B. The setting pressure is easily recognisable in that, when it is reached, the valve discharges the air emitting a little noise.
- Position the valve in the horizontal axis and check that you can pressurise it to values well above the setting pressure (eg. 7.25PSI (50 kPa) (0.5bar) without guaranteeing the maintenance).
If you detect abnormal behaviour, replace the valve.
N.B. Any malfunction of the valve can cause deformation of the fuel tank or aggravate the working conditions of the canister.
Troubleshooting
Engine
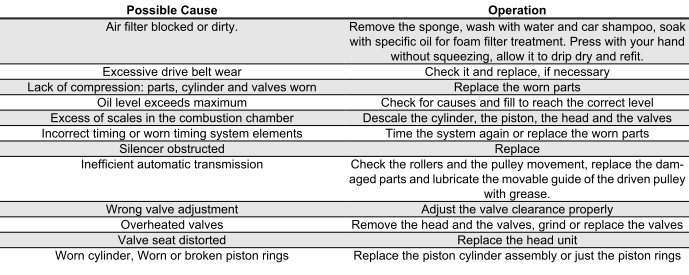
Poor performance
POOR PERFORMANCE
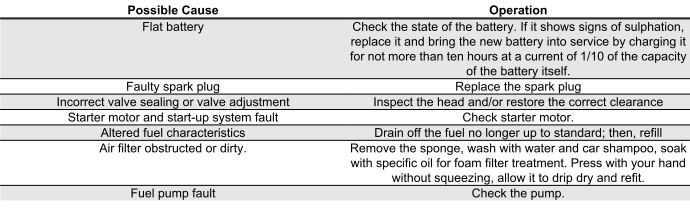
Starting difficulties
START-UP PROBLEMS
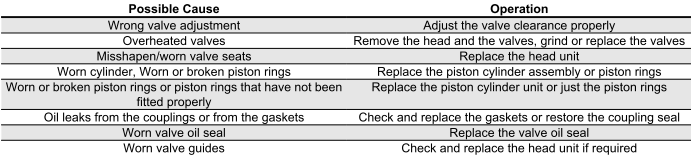
Excessive oil consumption/Exhaust smoke
EXCESSIVE CONSUMPTION
Insufficient lubrication pressure
LOW LUBRICATION PRESSURE

Transmission and brakes
Clutch grabbing or performing inadequately
IRREGULAR CLUTCH PERFORMANCE OR SLIPPAGE

Insufficient braking
INEFFICIENT OR NOISY BRAKING
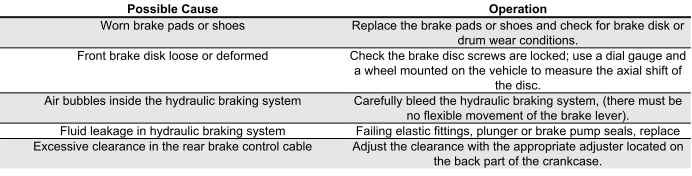
Brakes overheating
BRAKE OVERHEAT

Electrical system
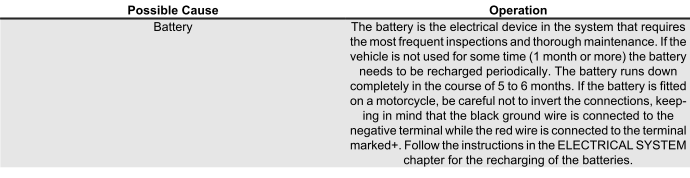
Battery
BATTERY
Steering and suspensions
Heavy steering
STEERING HARDENING

Excessive steering play
EXCESSIVE STEERING CLEARANCE

Noisy suspension
NOISY SUSPENSION

Suspension oil leakage
OIL LEAKAGE FROM SUSPENSION

See also:
 Vespa Primavera 50 - Service manual > Engine oil
In four stroke engines, the engine oil is used to lubricate the timing elements, the bench bearings and the thermal group. An insufficient quantity of oil can cause serious damage to the engine.
Vespa Primavera 50 - Service manual > Electrical system
KEY Battery Starter relay contacts Starter motor Main fuse Ignition switch Secondary fuses Voltage regulator Magneto flywheel Speed sensor Instrument panel MODE button Turn indicator control Pre-installation for anti-theft device Turn indicator switch Left turn indicator bulbs Turn indicators warning lights Right turn indicator bulbs Stop light Stop buttons Starter button Starter relay coil High beam warning light Light switch Headlight relay Headlight Saddle opening actuator Horn button Horn Engine oil pressure warning light Engine oil pressure sensor Fuel level transmitter Fuel gauge Low fuel warning light Roll-over sensor Engine stop switch Immobilizer LED Left front daylight running light Right front daylight running light Rear daylight running light License plate light Injector Idle valve Engine speed sensor Engine temperature sensor Lambda probe Fuel pump H.V. coil Injection warning light Throttle body position Diagnostics socket Immobilizer antenna Injection ECU
 BMW R 1250 RT
 Kymco Agility 50
 Piaggio Liberty 50
 Yamaha aerox NS50
 Aprilia SR50R
 Kymco Agility 50
 Vespa Primavera 50
 Peugeot Speedfight